How we integrate
WooCommerce is a customizable platform. This means that a one-size-fits-all integration, like a plugin, doesn't work very well on WooCommerce. Instead, our engineers have created a customizable module to make integration easy for you. Our engineers will review your store's custom setup in WooCommerce, add our WooCommerce Duty and Tax module and adjust the code to accommodate your store.
Integrate
Seamlessly integrate Landed Cost with your WooCommerce store by following the steps in this section.
Get started
Start by completing our sign-up form. Onboarding will commence once your account agreement is in place.
Onboarding
Within 24 hours of signing up, a dedicated onboarding representative will contact you to kick off a tailored integration process.
Important: The steps listed below are for your reference and you will be guided through them by your onboarding representative.
Install the Duty and Tax module
The Duty and Tax module is only available for installation through our Professional Services team. Our engineers will install the Landed Cost module for you once you start onboarding with your Project Manager in onboarding.
Optional—Add your product information
Product information like weight and dimensions can automatically be used in our calculations if you have them present in WooCommerce or Catalog.
However information like HS codes, country of origin, and item restrictions must be either entered in Catalog, or mapped to attributes that you set up in WooCommerce. To map this product information in WooCommerce:
- Create the custom attribute in WooCommerce using the slug in the table below to allow us to recognize it in our mapping.
- After creating the attributes for your store, go into your product listings and add the attributes with their values, using the table below. Instructions for how to add custom attributes to product listings are at the bottom of the article above.
- Item restrctions require a third step: Zonos will need to write a rule on our end to restrict the items you have set as restricted in WooCommerce. Please let us know if you are setting up item restrictions in WooCommerce so that we can complete this step.
| Attribute | Slug | Value |
|---|---|---|
| Hs code | hs_code | The HS code example: 1234.56.7890 |
| Country of origin | country_of_origin | Two letter ISO code of the country example: CA |
| Item restriction | int_restrict | The word "restrict" for any product that you want to restrict |
Configure the Duty and Tax module in WooCommerce
Our engineers will adjust the settings as needed. They will work with your Project Manager if they have any questions for you.
Test your integration
Now that you have set up your account and your module, you are ready to test it by doing the following:
Test duty and tax quotes
- Add item(s) to your cart. We recommend using a higher value (above the de minimis) to ensure that duties and taxes will be due for the order.
- Click Checkout.
- Add an international address to your checkout.
- If set up correctly, you will see a duty and tax quote below the shipping cost in the order summary.
Test order flow through your systems
- Place an order on your site for testing purposes.
- Follow your test order through your systems for fulfillment, label printing, and finances to ensure there are no conflicts.
If you print your labels from Dashboard
-
Confirm labels will generate successfully by printing a test label. If you have multiple carriers enabled, print a label for each carrier. You can void your label after printing it, then use the same order to test more labels.
- If you receive an error when printing a label in the Dashboard, learn how to resolve label errors.
-
Once tested, void the label, then cancel and refund your test order.
After completing testing, you are now ready to go live. Let your Project Manager know when you are ready, and they can enable the Duty and Tax module for you!
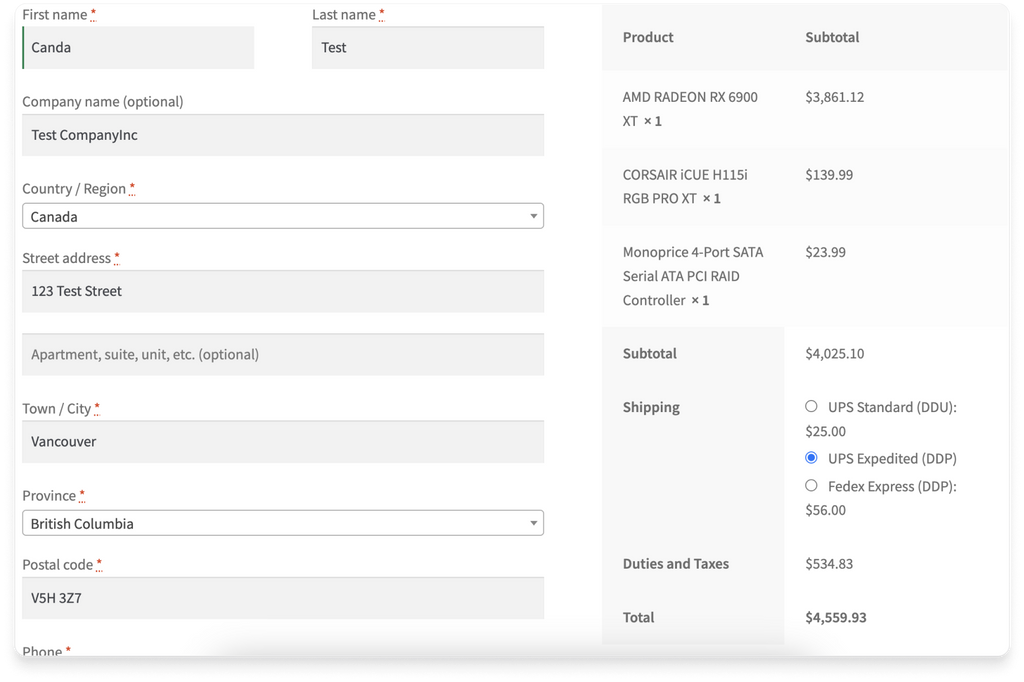
Example
Below is an example of a native WooCommerce checkout using the WooCommerce Duty and Tax module. Since WooCommerce is customizable, your checkout may look different from the one below.
Frequently asked questions
What product information should I provide for the most accurate quote on duties, taxes, and shipping costs?
Product information can impact the amount of duties and taxes due and the shipping cost. The more product information you provide to Zonos, the more precise the quote returned will be. Zonos can generate a quote even when this information is unavailable, but recommends providing the following key product details to improve accuracy:
- Weight: Weight impacts your shipping cost, which can affect duties or taxes. Weights in your WooCommerce product listings are automatically used by Zonos when present.
- Dimensions: Dimensions may impact your shipping cost, which can affect duties or taxes. Zonos can utilize product dimensions (length, width, and height) set on each product in WooCommerce.
- HS codes: HS codes impact duty rates and can sometimes affect taxes. In order for Zonos to use the HS codes set in your product listings in WooCommerce you must create a custom attribute in the app or add your HS codes to Catalog.
- Country of origin: A product's country of origin impacts duty rates and may affect taxes. In order for Zonos to use the Country of Origin set in your product listings in WooCommerce you must create a custom attribute in the app or add the Country of origin to your products using Catalog.
Product details passed to Zonos by WooCommerce
| Product details | Weights | Dimensions | HS code | Country of origin |
|---|---|---|---|---|
| Automatically passed | ||||
| Use a custom attribute |
Note: Alternatively, you can enter the info into Catalog, overriding the information stored and passed from WooCommerce.
Learn more about product info by platform.
Landed Cost for WooCommerce
Learn about our custom Duty and Tax module.Using the WooCommerce Duty and Tax module will allow the following: