Add your product dimensions
The first step in setting up cartonization is to add your product dimensions and packing preferences, such as whether an item ships alone, to Zonos Catalog.
To add products one at a time:
- Go to Dashboard -> Catalog and click on Add product in the top right-hand corner.
- Add your SKU and/or product ID (required) along with your product's Dimensional unit, Length, Width, Height, Weight unit, and Weight.
Note: If your item ships alone, mark the Ships alone checkbox.
- Click Save product.
To add products in bulk via CSV:
- Download the Catalog CSV template.
- Add your SKU and/or product ID along with your product's dimensional unit, length, width, height, weight unit, and weight to the Zonos CSV template.
Note: If your item ships alone, add
ships_aloneas the value in the Packing preference column. - Save your file as a CSV.
- Go to Dashboard -> Catalog -> Import products and then either drag and drop your file or by click browse to find and select your file.
- Follow the prompts to review your uploaded products and correct fields if there are any errors. To ensure the correct formatting and successful import of your products, follow the required formatting shown in this table.
- Click Import.
Items that ship in multiple boxes
When an item is assigned multiple boxes, Zonos uses the weights and dimensions of all the assigned boxes to accurately calculate a shipping quote.
To set up items that ship in multiple boxes:
- Input your item dimensions into Catalog (see steps above).
- Download and open the spreadsheet Multibox CSV template.
- In the Master Spreadsheet tab, include all product SKUs and/or product IDs for your items that ship in multiple boxes.
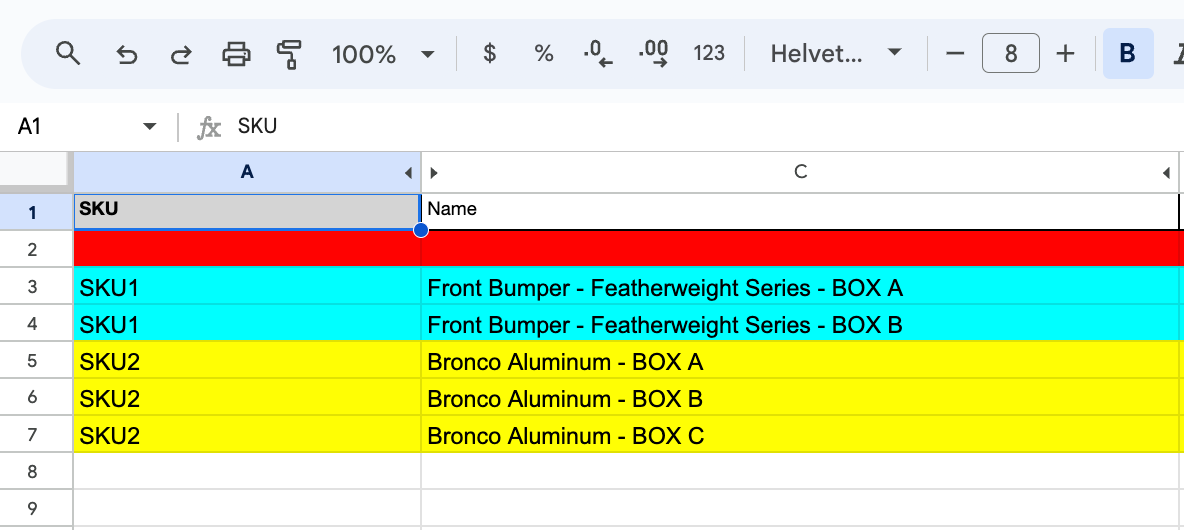
- Use the Child Packages tab to list each SKU with the corresponding box(es). Ensure each box is listed in a separate row. For example, if SKU1 ships in two boxes, list SKU1 in two separate rows, each with the respective box name and shipping box dimensions. Similarly, list SKU2 in three separate rows if it ships in three boxes, including the box name and shipping box dimensions for each.
- Send the completed sheet to your Project Manager if you're going through onboarding, or to support@zonos.com if you're already using Zonos.
Create packaging options
The last step in setting up cartonization is to create your packaging options. If specific packaging options are not defined, a default size of 8x4x2 is applied.
- Add your shipping boxes by going to Dashboard -> Settings -> Cartonization.
- Click Add box in the top right corner.
- Add your box's Dimensional unit, Length, Width, Height, Weight unit, and Weight.
- Optional— Name your box. If you don't, we'll name it based on its characteristics.
- Optional—Mark your box as your default box by checking the Make default box size box.
Note: Default boxes are used as a fallback when no box size is applied to the order.
- Click Add box.
Set up cartonization
Start cartonizing by setting up product dimensions and box sizes.
Setting up cartonization is essential for an optimized shipping experience, ensuring accurate shipping quotes and efficient packaging.
To start, you need to provide your product dimensions and shipping box sizes. This allows cartonization to accurately calculate and efficiently pack your items into boxes.